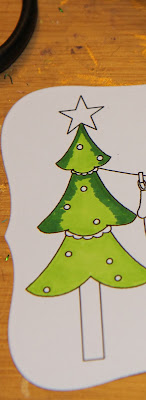
I picked 3 colours of green, you can pick any three colours as long as one is light or bright, and two are dark green, or any colour you wish to use.
I used Promarkers in Bright Green, Forest Green and Pine.
Step 1. Colour the main part of the tree in Bright green (it looks quite flat with just one colour). You could colour all over the baubles then go over them with a stronger colour, or liquid pearls or glitter glue.
2. Try your two darker colours to establish which is darkest, in this case it is Pine, using pine colour the edges of the shapes and feather inwards, that is make little horizontal lines tapering towards the top, making sure to add a shadow under the tiers. (Last tier left out to show the difference).
3. Take your second darkest green, in this case Forest Green, and feather some more inside the original feathering.
3. Take your lightest green, in this case Bright Green, and blend over the other two colours. It will look dark but will dry lighter.
Finished trees. Image is by The Cutting Cafe and is called Christmas Stocking Line.


No comments:
Post a Comment
Thank you so much for your comment, I love to hear from you. Your comment will appear in a little while when I moderate it.
You might be seeing a verification thingy here, but I have verification turned off and I believe that you will be able to ignore the verification and just leave a comment anyway! Go on - try it.